Easy methods to improve your makeup application
- Marta

- Feb 2, 2020
- 9 min read
If you know me, you know I'm a huge makeup lover. And if you don't, you're about to find out. Here are some basic application methods I've learned while playing with makeup that will help you improve your *lewks*. A disclaimer: I'm not an MUA, or qualified in any way, these are just things I've learnt over time by watching countless Youtube videos and sitting on my bedroom floor with all my brushes and products scattered around me. These techniques and tips are all super basic and nothing fancy but have made a huge difference to my makeup routine.

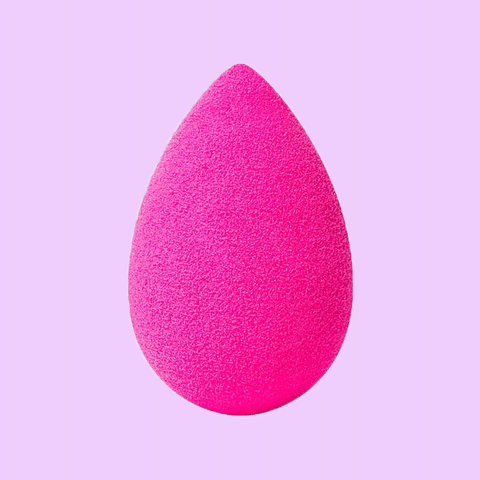
Using a beauty sponge
Let's start with the foundations (ha, get it?). The way you apply your base can be the difference between streaky looking foundation and flawless airbrushed skin. First of all, let's agree that there are no real rules to makeup, it's all about creativity and individuality. It's up to you how you want to apply your makeup, these are just my preferred and tested methods. I personally prefer a damp beauty blender because I find it gives you the most even coverage. If you're not that into makeup and you're using your fingers to apply your foundation, don't be scared of the beauty sponge. It's a really easy to use soft makeup egg, and I'll explain exactly how I use it.
When choosing a beauty sponge you want to purchase one which is soft. In my experience, hard makeup sponges tend to not absorb as much water and expand like soft ones do. For those with a bigger budget I recommend the beauty blender, and for a more affordable option I suggest the real techniques beauty sponge.
To use your beauty sponge you want to wet it first. You want the sponge to be damp and to expand in size, giving you a larger surface area to work with. Wetting your sponge will stop it from absorbing your foundation while you apply it. If your sponge is too wet your foundation might become slick and have a different finish, so make sure to give your sponge a big squeeze before you use it. To work the foundation in, I place the foundation directly onto my face and then use the sponge to pat it in gently all over. Make sure you get your neck too! You want all of it to blend in smoothly, so just keep patting until it looks even.
Make sure to keep your sponge clean by washing it after use and storing it in a warm and dry place. If you leave your beauty sponge soaking wet on a windowsill, don't be surprised if it starts getting gross. It's recommended you replace your beauty sponge every 3 months.
Coming soon: Keep your eyes peeled for a post all about foundation matching!
Use eye primer
If there's one thing that can really change your life when applying makeup, it's eye primer. Does your eyeliner smudge all over the place and wear off throughout the day? Does your eye shadow crease and move? Do the eye shadows you apply look duller on your eyelid than they do in the pan? It could be because you're not using eye primer!
Eye primer makes everything stay and stick to your eye. It means that your eyeliner won't budge, that your shadows are set in place and gives the eye shadows a blank canvas foundation to have the best colour payoff. I promise eye primer is a huge game changer, especially if you wear eyeliner often.
I personally recommend the Urban Decay Eyeshadow Primer Potion, but it's quite pricey.
Eye shadow placement
There are a million ways you can do your eyeshadow. There are halo eyes, there's the cut-crease, smoky eye, rainbow eye etc, etc. Today I want to focus on the most basic, in my opinion, eye shadow application method that anyone can learn. It's super easy, works with basically all colour palettes, and is easily modified to add a bit of pizzazz when you're ready to experiment.
Let's take it step by step. The palette I am using in this example is the Beauty Bay EYN 16 Colour Fiery Palette. It's vegan, cruelty free and fairly affordable for £10. I find the quality is really great for such a competitive price. It's a practical and wearable palette, so I would definitely recommend.

Step 1.
After applying eye primer, apply a light base colour all over the lid with a wide fluffy brush. Blend evenly, this base will ensure the shadows can blend smoothly on top of it and starts you off with a blank canvas, allowing the other shadows to be true to colour and really pop.
Step 2.
Take the light brown shade 'honey roast' and blend it with a fluffy brush into your crease. The crease is where your eyelid naturally folds when you look up. The placement of this shadow can be different for different eye shapes, so if you have hooded eyes you might want to bring the crease shade higher up. This shade is usually your 'transition shade', meaning it allows for a smooth transition between colours while blending. This means you want to choose a shade which can easily blend with the other colours. For example, I used a shade that's somewhere between the light creamy shade and the darker brown shade I'm using later, basically a light brown. However, if I chose a green shadow it wouldn't really work. You can also place this shade on your lower lash line if you want, to engage the bottom of your eye into the look. Doing this and blending it out can make your eyes look larger, while keeping it tight with your waterline can make them look smaller. Like I said, this method of eye shadow placement can be used for any colour combo. If you're practising this look with red eye shadows, you want to go for a shade that is somewhere in between the rest of the colours you're planning on using. Maybe a dusky pink, in that case. Placing the shadow in the crease helps create a more even blend.
Step 3.
In the outer V of the eye, or the outer corner, you want to use a dense brush to pack a darker shade. In my case, I used a darker brown shade called 'caramel sauce'. This creates depth. You want to blend this darker shade really well into the crease colour, this makes for a smooth transition between the darker, harsher 'caramel sauce' shade to the lighter shade in the crease called 'honey roast'. You can also blend this into the outer corner of your lower lash line, create further depth and homogeneity within the lewk. You essentially want to create a gradient when blending, in my case I want go outwards from dark brown, to light brown, to cream.
Step 4.
Now, time to spice it up a bit! I love metallic, glitter, and shimmer eye shadow, it's so pretty and adds a whole new dimension to your makeup look. I usually choose a colour that is a the sparkly equivalent of the shade I use in step 3, or a bit lighter. I went for shade "new penny". This just makes it easier, but feel free to experiment and use different shades and colours. You can either use a flat packing brush or your clean finger tip to apply it. Dampen your brush or finger with some setting spray, dip into the shade and carefully tap the shadow onto the middle and inner corner of your eyelid. You want to do it gently, in case there is any fall out. If there is, don't panic. Just grab a clean face powder brush and swipe it away. To make the metallic shadow seamlessly blend into the matte shadow on your outer eyelid, you can grab the shadow you used in step 3 and use a little bit of it to blend where the dark and metallic eye shadow meet.
Step 5.
Finally, add a pop of sparkle and even more dimension by adding a very light metallic or shimmer shadow right in the inner corner of your eye. You can even get super creative and use a neon shadow or accent colour if you feel it compliments the other shadows. I used shade "all that glitters" and used my finger, as described before, to pat it onto the inner corner. I also put some on the inner lower lash line.
If anything was unclear in this step by step don't be shy and drop me a message, I'm potentially considering some video tutorials or pictorials to make it easier to follow. This is just a little trial to see what tutorials work best.

Use your finger or wet brush for metallics
Just a quick note on why applying metallic eye shadow is best done with a damp finger or brush. I already explained that this is the way I apply metallic shadows in the above segment, but here is why. Have you ever seen the most beautiful, shiny, pigmented, gorgeous metallic shade in the pan and dipped into it with a brush only for it to have minimal payoff and very little sparkle? I have, until I learnt the ways of dampening the brush (or even better, using your finger tips!). I find that metallic shades can drastically change in appearance when applied with different tools, so I made this comparison for you.
This is shade "sleepwalker" from the EYN Fiery palette, without flash.

With flash.

If you want a softer look, feel free to use the brush only. But if you want to be extra, like me, go ahead and spray some setting spray on a packing brush or you finger tip, dip into the pan and pat the shadow where desired!
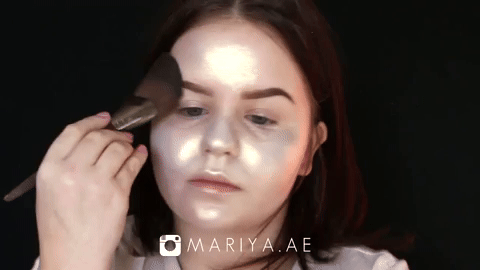
Placement for bronzer
The purpose of bronzer is to make your skin look warmer, add dimension to your face and sculpt it after you applied foundation. Placement of products like bronzer, blush and highlight can enhance your face shape and lift up your features. Here's a crash course on how to apply these products, or at least how I apply them.
Applying bronzer can be terrifying, the risk of accidentally overdoing it and ending up looking muddy is very real. Here is my advice: start small. Apply only a little bit at a time, it's easy to build up but not so easy to get rid of too much product. As you can see in the picture, I apply bronzer in the shape of a number '3'. On the sides of my forehead, to my temple, under my cheekbone, by my ear and on my jawline. The bronzer isn't blended out yet, so it's visible how I just kinda blot in on to mark out where I want it before I start working it in. Using circular blending motions just keep going over that '3' shape until there are no harsh lines. You can always add more if the product blends out too light. If you accidentally went too dark you can keep blending it in, or using a bit of face powder to try and neutralise it.

Placement for blush
Applying blush can really tie your whole face together, especially if the colour compliments your eye shadow or lip stick. The thing that I found trickiest about blush is the placement, but

I finally found the sweet spot when it comes to application. You want to use a medium fluffy face brush and start light. Just like bronzer you can always apply more product to build up, but it's hard to come back from over doing it. Tap and swirl the blush onto your face starting from the apples of your cheeks (try smiling and apply to the parts of your cheeks that 'lift' when you smile) up to your temple. Make sure to blend well in circular motions and keep the blush on the upper portions of your cheeks like shown on the picture to the left. Placing the blush any lower can pull your features down and looks less flattering. Just like with bronzer, if you apply too much blush you can try
toning it down by using a clean face brush and face powder and applying it over the blush. Bonus tip: apply some blush to the tip of your nose if you want to feel like an adorable blushing fairy.
Highlight placement
Finally, let’s focus on highlight and specifically where to put it. It’s tempting to rub the sparkly goodness all over, but I find it’s more effective applied strategically.
Use a fluffy highlight brush, I use a Real Techniques highlight brush, and in a swiping motion apply the highlight to the parts of your face which would naturally catch the light. For example, the tops of you cheeks, the tip of your nose, your cupids bow, and eyebrow arch. Blend the highlight in a little bit, as you don’t want the edges to be super harsh.

There’s not really a lot to this step, other than just finding where the highlight placement works for you. For example, applying highlight to the middle of the tip of my nose doesn’t work for me. Instead I apply it on the sides of the tip. You might also want to experiment with different shades to find the right colour for you. A cool silver shade washes me out too much and looks too pale on my skin, so I find champagne highlighters work best for me. The highlight I’m currently using is by OFRA.
If you're open to experimenting and being adventurous with your looks, try out some rainbow highlighters in fun shades like pink, blue or green!
Here is the final look I achieved following my makeup routine, it’s soft but has a little *glam* factor. I’d love to hear your opinions on this post and if you would be interested in more in-depth explanations or specific tutorials, and whether you’d prefer them in video, pictorial or text form!

Comments